Posted on

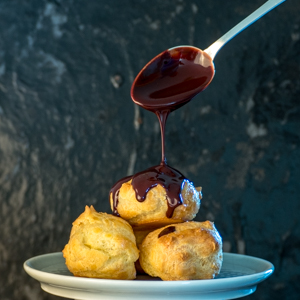
Chocolate mousse and spoon cookies

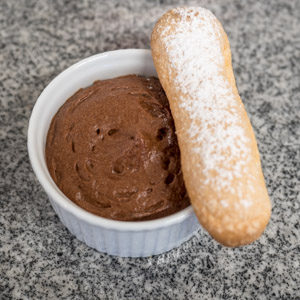
For this recipe, we’re going back to childhood with my mom’s “faster, you die” chocolate mousse (which disappears just as quickly as it is made, by the way) and spoon cookies to accompany them.

INGREDIENTS. Chocolate mousse (for 6/8 people):

  • 250gr of dark chocolate
  • 6 eggs (6 whites + 5 yolks)
  • 125gr of butter in pieces
  • Optional flavor: cognac, spices, citrus zest …

NOTE. A yolk is not used in the recipe, but it will be used in the spoon cookie recipe.

RECIPE. Chocolate mousse

Chocolate mousse

NOTE. Using a double boiler (a bowl over a saucepan with a little water) helps make sure you don’t overheat the chocolate. Indeed, chocolate melts at 36 ° C, but it burns at 55 ° C, so if you put it to melt directly on the fire, you have to be very careful, the bain-marie allows you to be more serene. Nevertheless, the material remains fragile and it is necessary to watch the cast iron.

ETHICS. Chocolate deserves several hundred of articles which I cannot develop here. Better keep in mind that this is a precious material. We should never forget that our knowledge of this product is linked to the history of Mesoamerica and the Aztecs, who were invaded, decimated and whose culture was destroyed. We would also like to recall here that in 2011, its culture employed 1.8 million children in Ghana and Côte d’Ivoire. It is therefore important to fight against this scourge and to choose suppliers who work against this type of practice.

HISTORY. Xocoatl is a Mesoamerican drink (from Mexico to northern Central America) made from fermented, roasted and crushed cocoa beans used by the Aztecs for over 110 years BC. It is a luxury product that serves as a bargaining chip. The conquistador Cortès discovered it in 1519 and brought it back to Europe in 1528. But it was only successful in 1534 when the idea was to add honey to reduce its bitterness. Its trade in Europe began in 1585 using Mesoamerican slaves. The first chocolate factory opened in London in 1657.

Once the chocolate has melted, transfer it into a salad bowl and add the butter. Mix until the butter is incorporated. Then add the egg yolks without stirring too much.

If you want you can add flavoring at this stage.

Whip the egg whites until stiff, not too firm as they would be too hard to incorporate. Gradually add them to the chocolate mixture. To prevent the egg whites from sagging, mix gently with a spatula, trying to coat the whites with the cocoa mixture. Add more whites when the previous addition is already well incorporated, around 80-90%.

Pour either into individual ramekins or into a bowl to share.

Cover and let set for at least 6 hours in the refrigerator.

INGREDIENTS. Spoon cookies (for about 30 pieces):

  • 4 eggs (4 yolks + 3 whites)
  • 75gr of caster sugar (= fine)
  • 92gr of flour
  • icing sugar

NOTE. A white is not used in the recipe, but it was in the chocolate mousse recipe.

NOTE 2. Spoon cookies can be used for charlottes or tiramisu, or more simply as a snack, dipped in your favorite drink.

NOTE 3. Spoon cookies are distinguished from ladyfingers by the clarification of the eggs (separation of yolks and whites). By doing this clarification, the whites can be whipped to snow and make these cookies softer.

HISTORY. Short story, the origin of the recipe is once again Italian with Catherine de Medici. On the other hand, it would be Antonin Carême, cook of Talleyrand, who, while the cookies molded with a spoon did not fit into the Madeira glass to be soaked there, would have had the idea of pouring the dough into a funnel attached to the ceiling to make thinner cookies. This would be the version 1.0 of the pastry bag.

RECIPE. Spoon cookies

Preheat the oven to 200 ° C.

Sift flour.

NOTE. In pastry making, the flour is always sifted in order to avoid impurities and lumps. I don’t always write it down because it is not essential in the practical and “everyday” recipes that I suggest here. However, for this recipe it is really necessary to sift it.

Likewise, pass the egg yolks through a sieve or colander, they will be easier to incorporate later.

Start whipping the egg whites slowly (half the strength of your appliance, certainly), and gradually add the sugar until the texture is firm (it remains trapped in the whisk). Add the egg yolks, stirring with a spatula as gently as possible so as not to break the egg whites. Add the flour, again, stir gently by enclosing the flour in the egg whites little by little. Do not mix more than necessary.

When the mixture is homogeneous, poach your cookies on a baking sheet lined with baking paper. Either with a pastry bag, or with a tablespoon (the cookies will be larger and therefore softer).

Sprinkle with icing sugar for the first time. This will melt on contact with the dough, this is normal. When it is melted, sprinkle a second time with icing sugar and bake for 8 to 10 minutes depending on your oven.

Bon appétit !

Posted on Leave a comment

Profiteroles

A favourite dessert from my childhood, and certainly somewhere one of the founding stones of Choux etc!

HISTORY. The tradition seems to start in the 16th century, Profiteroles – etymologically “small profit” – are used to reward servants. The tradition seems to start in the 16th century, Profiteroles – etymologically “small profit” – are used to reward servants

In the 17th century, the recipe evolved and they are balls of bread containing meat cooked in a soup.

The recipe we use today is said to have been initiated by Penterelli, who developed a “hot dough”, a dough dried out on the fire. Popelini, cook of Catherine de Médicis, takes this recipe and decides to garnish this hot dough with fruit jelly and calls them the dolls.

It was finally in the 19th century that Jean Avice, disciple of Antonin Carême (high priest of pastry), who decided to garnish the choux pastry with pastry cream or whipped cream.

Adding chocolate sauce and garnishing with vanilla ice cream is said to have been done around 1875.

NOTE. The Profiteroles can therefore be garnished with your choice of pastry cream, whipped cream or ice cream. The family recipe I’m sharing with you today uses a variation of custard (pastry cream).

INGREDIENTS – Choux pastry – 4-6 people

  • 250gr of water
  • ½ teaspoon of salt
  • 15gr of sugar
  • 100gr of butter
  • 160gr of flour
  • 4 eggs (+ a little beaten egg for the gilding)

RECIPE – Choux pastry

Preheat the oven to 180 ° C.

Pour the water, salt, sugar and butter in a saucepan. Heat gently to melt the butter. Once the butter has melted, bring to a boil.

When the liquid boils, remove the pan from the heat, add the flour all at once and try to incorporate it as quickly as possible with a spatula.

NOTE. The dough obtained at this time is called the “Panade ”, it is used in making choux pastry, quenelles, or dauphine potatoes.

Return the pan to low heat and dry the “Panade”, stirring constantly, until the dough has a slightly shiny / gleaming appearance. A film of dough will have settled at the bottom of the pan.

Place in a bowl and immediately put a little water in the bottom of the pan to be able to clean it more easily later.

Add the eggs one at a time. The dough breaks up with each addition, this is normal, stir with a spatula until the dough is smooth again. The choux pastry is ready when the dough has the “soft bird’s beak” texture: take out the spatula vertically and put it horizontally, the dough tip should fall gracefully, forming a quarter of a circle or the beak of a bird of prey.

NOTE. The choux pastry can be used for several shapes of pastries, only the way of shaping it before baking changes the name: Chouquettes, Eclairs, Saint-Honorés, Salambo, Swans, Paris-Brest, Nuns …

NOTE2. A version without sugar and with the addition of grated cheese will give Gougères, always a success as an appetizer!

Arrange on a baking sheet placed on a baking tray. Either with a pastry bag or with two teaspoons: take a teaspoon full of dough and slide it onto the baking sheet with the other spoon.

With a brush or a fork, cover the Choux with the beaten egg. Apply a fork on each Choux to make crosses on top. This will help the Choux to grow more evenly.

Bake 20-25 minutes.

NOTE. Do not open the oven at the beginning of cooking, the Chou will fall out. After 20 minutes, it shouldn’t be a problem to quickly open the oven to check the doneness: already at the color, and then to be sure, tapping with a fingernail under the Chou, it should ring hollow.

Let cool before garnishing.

INGREDIENTS – “Saint-Honoré” cream

  • 500gr of milk
  • 2 eggs
  • 70gr of flour
  • 200gr of sugar
  • Scent: 1 vanilla pod

NOTE. For the flavour, vanilla remains the “classic” today for this dessert, but you can completely flavour the cream with whatever you want: praline, pistachio paste (and then opt for a red fruit coulis), chocolate for chocolate profiteroles …

RECIPE – “Saint-Honoré” cream

Pour the milk and the perfume into a saucepan.

Clarify the eggs (separate the whites from the yolks). Add sugar and flour to the yolks and mix.

Boil the milk. Pour half of it over the egg yolk-flour-sugar mixture. Homogenize quickly. Return to the saucepan and mix well. Return to the heat gently while stirring continuously, but slowly, scraping the bottom of the pan well so that nothing sticks and the cream cooks evenly). Even if you return to low heat, the boil will resume. This is normal, keep stirring (vanner in French) and allow 2 minutes from the start of the boiling, then put in a bowl.

If you have a kitchen thermometer: above all, do not exceed 85 ° C, this is the coagulation temperature of the egg yolks, you would end up with small pieces in your cream, omelette style …

Whip the egg whites but not too firm: they will incorporate better if they are flexible. Add them to the custard.

NOTE. This latest addition of raw egg whites to the pastry cream is a family recipe and doesn’t match any other recipe I’ve been able to find. Moreover, I have not found any reference elsewhere to the name “Saint-Honoré cream” which is used in the grimoire of my family recipes … The connection seems to me to be with the “Chiboust ” cream, often used in the making of Saint-Honorés, and which can be, according to the recipes, based on Italian meringue (egg whites whipped to snow and cooked with a sugar syrup)

NOTE 2. The fact of adding the raw egg whites means that the shelf life of this cream will not be long (24 hours maximum). You can also use the pastry cream without the whites.

NOTE 3. Pastry cream is another derivative of “custard”, which I have already mentioned for snow eggs and migaine, used for quiches.

MOUNTING.

When the puffs have cooled, garnish them with Saint-Honoré cream: with scissors, cut a “hat” from each Choux, garnish generously with cream using a small spoon and replace the caps.

If you have a pastry bag, you can also make a cross under each Choux with the blade of a knife and garnish them from underneath.

Reserve in the refrigerator until ready to taste.

NOTE. If you have any pastry cream left over, you can simply serve it in small jars with fresh fruit.

INGREDIENTS – Chocolate topping

  • 150gr of chocolate
  • 100gr of butter

RECIPE – Chocolate topping

Gently melt the chocolate with the butter in a double boiler. Homogenize while stirring and serve hot.

NOTE. Chocolate does not tolerate high temperature, which is why it is often melted in a double boiler, which prevents it from coming into direct contact with the heat source, melting is smoother.

Photo credit Nicolas Girodon-Déniel

Posted on Leave a comment

Ile fottante (Snow eggs)

One of my dad’s favorite desserts. Another recipe quick enough to make, and adaptable to envy!

HISTORY. The first mentions are found in cookbooks or in the dictionary of the French Academy around 1800.

A DIFFERENCE WITH THE FLOATING ISLAND? Yes and no. According to Escoffier, a reference in cuisine, the floating island is a dessert (a jelly or a cake …) surrounded by a thin custard sauce. The only point in common with our recipe is the custard. Nevertheless it would seems that today the recipe is much the same unlike cooking meringues, which is done for floating islands in a bain-marie in the oven, while poached for the snow eggs.

INGREDIENTS – Custard Sauce – 4-6 people

  • 400gr of milk
  • 4 egg yolks
  • 30gr of caster sugar
  • 1 vanilla pod

NOTE. This recipe is not very sweet, but you can adjust the sugar portion according to your taste. Likewise, I have indicated caster sugar, but you can choose the sugar you like: honey, brown sugar, agave syrup …

Some recipes indicate proportions up to half-cream, half-milk. Take the test and choose accordingly to your preference!

NOTE 2. I have put a vanilla pod for a “classic” version, but you can flavour your custard with orange blossom water, citrus zest, coffee, chocolate, rum or a fruit alcohol…

RECIPE – Custard Sauce

  • Mix the egg yolks and the sugar. No need to whiten them or even make them foamy, we even try to avoid it.
  • Put the vanilla bean seeds in the milk and boil.
  • When the milk boils, add a part (about a third) to the yolks + sugar. Mix quickly so that it is homogeneous. Then return to the pan with the rest of the milk, off the heat. Mix again quickly to homogenize.

If you had a whisk, it’s time to get rid of it, it tends to incorporate air to make the mixture frothy, that’s not what we want.

  • Return the pan to medium heat, and “vanner”(stir) the cream: mix (with a spatula with a flat tip preferably) without stopping, but quietly, scraping the bottom of the pan well so that nothing sticks and the cooking of the cream is homogeneous.
  • The cream is cooked when you have reached the “tablecloth” cooking: immerse a tablespoon in the cream: it should coat the spoon well. And the second means of validation: on the back of this spoon coated with cream that you hold horizontally, draw a line with your finger. If the cream above the line remains in place and does not pretend to flow, your cream is ready!

If you have a kitchen thermometer: do not exceed 85 ° C, this is the coagulation temperature of egg yolks, you would end up with small pieces in your cream, omelette-style. . If this happens to you, don’t panic either, mix your cream and filter it. It won’t be as creamy as it should have been, but you can still use it.

  • Once cooked, put it in the serving dish (or individual cups). Let cool a little at room temperature before storing in the refrigerator.

NOTE. The “custard” is a mixture of milk / cream and eggs. It has several derivatives in addition to our custard, such as custard or migaine, used for quiches.

INGREDIENTS – Meringue

  • 4 egg whites
  • 30gr of caster sugar
  • A little salt

NOTE. You can optionally replace the caster sugar (= fine) with icing sugar.

RECIPE – Meringue

ADVICES Two tips before you start:

  • To make a good snowfall, the whites should not be in contact with fat: you need very clean equipment, and above all you should not have a trace of egg yolk in your whites!
  • The whites in snow assemble at low speed, to gradually incorporate the air.
  • Prepare a flat plate and place a clean cloth over it. This will serve to drain the meringues after cooking.
  • Take a large diameter pan. Fill it with water 2cm high and bring it to boiling point.
  • Mix the salt with the sugar.
  • Beat the egg whites until they are frothy.
  • From this moment, add the sugar in three batches.

To find out if your whites have the right consistency, take the whisk out of the meringue vertically and set it horizontally. If the tip of meringue at the end forms the “bird’s beak”: it falls gracefully, forming a quarter of a circle or a raptor beak, the meringue is perfect! ! If it still dangles a little too much, continue to whip. And if small grains appear, it is because it’s been too much whipped…

Once the whites have gone up in snow, they must be used quickly.

  • Poach the meringues: Take portions of meringue with a spoon (for more consistency, you can also use an ice cream scoop). Place them on the surface of the water and let them cook on all “sides” for about 2 minutes in total. The meringues will swell when cooked. If they deflate, it is because they are overcooked, this will give you a pointer to reduce your cooking time.
  • Once cooked, take them out with a slotted spoon and let them drain on the cloth on the plate.
  • When they have cooled down and are well drained, place them in the serving dish.

NOTE. Some recipes recommend poaching the meringues in milk, which is then used to make custard. Another possible variation according to your tastes!

NOTE 2. This cooking produces eggs with firm snow and good chewiness. If you are fonder of an airy and cloudy consistency, I advise you to bake your meringues in the oven, 3 minutes at 180 ° C, after filling well-buttered moulds. Wait well before unmoulding them.

SERVICE. You can serve them with almonds (or another dry fruit) roasted for 10 minutes at 180 ° C, or caramelized. You can also coat them with caramel, a chocolate or red fruit coulis, or maple syrup …

Yummy !

Photo credit Nicolas Girodon-Déniel

Posted on Leave a comment

Gratin dauphinois (the potato gratin)

A great classic dish in France, and as with each specialty, 100 different recipes for 100 Dauphinoise families!

HISTORY. The potato tuber comes from Peru, where it has been consumed for more than 8000 years. It arrived in Europe during the 16th century following the discovery of Latin America. The potato tuber was not immediately successful in France, from where it arrived from Switzerland. This explains why it became a specialty of Dauphiné (which today corresponds to the departments of Isère, Drôme and Hautes-Alpes). And especially from the land of the Four Mountains, in the Vercors (southwest of Grenoble).

CONVENIENT. Today there are more than 10,000 varieties of potatoes, but the ones we know / grow are classified in (almost) 4 categories:

  • AT . firm and not very floury flesh (Charlotte, Belle de Fontenay, Amandine for example)
  • B. melting flesh (Agata or Monalisa for example)
  • C. floury flesh (Agria or Bintje for example)
  • D. very floury, which we do not use in our kitchens
  • and all in-between: AB, BA, BC, CB, CD, DC

INGREDIENTS – for 4-6 people

  • 1kgr of potatoes
  • 250gr of whole milk
  • 200gr + 100gr of whole liquid cream
  • salt
  • [optional: 1 garlic clove, nutmeg / pepper]
CHOICE OF POTATOES. The classification of potatoes mentioned above will unfortunately not help us here. What you need for the gratin are starchy potatoes.
The starch is also contained in flour and is used as glue and to thicken sauces.
New potatoes – or early potatoes – do not contain them, so you should use”old” potatoes.
And there is no classification of potatoes in relation to the starch they contain … So we have to experiment and remember which ones have worked.
Those which are known to work in gratin:
  • Monalisa – for a fondant gratin (category B)
  • the Bintje (cat. C)
  • Agria (cat. C)
  • Nicola – for a firm gratin (cat. A)
  • Belle de Fontenay – for a firm gratin also (cat. A)
  • Charlotte – for a gratin with a softer, sweeter taste (cat. A)
NOTE. No need for cheese to brown, but it will bring a crispy consistency.
NOTE 2. You can, according to your preference, increase / decrease the proportion of cream: it is enough to make sure that the total final weight of milk + cream remains equally the same.
RECIPE
  • Preheat your oven to 150 ° C.
  • Wash the potatoes with their skin.

NOTE. We won’t wash them after that to keep the starch level to the maximum. It’s the starch that allows the connection with the cream.

  • Peel the potatoes and cut them into strips (if possible regular, the thickness of a piece of € 1 or CHF5).
  • If you put some garlic, you can either divide it between the layers later, or rub the dish with it now.
  • Butter the dish (so that the starch does not stick too much to the edges of the dish).
  • Spread a layer of potatoes. Salt. [Add a little garlic if you chose this option, you can also season with pepper or nutmeg]
  • Repeat until you used all the strips.
  • Pour the milk and the big part of the cream, you should be at level with the potatoes.
  • Cook for 1 hour.
  • Pour the rest of the cream and cook for another 30 minutes.

NOTE. It is the slow cooking that makes the particularity of this gratin, the potatoes are candied in milk and cream …

VARIANTS. The recipe of the country of the four mountains does not use milk, eggs or Swiss cheese. Therefore, the recipe I am proposing is not completely faithful, but a little less rich.

Some people use eggs for binding, or cheese for gratinating, and it’s far from prohibited:

  • Joël Robuchon did not use eggs, but gruyère
  • Fernand Point used eggs, but no gruyère
  • Paul Bocuse and Auguste Escoffier used eggs and gruyère

IDEAS. Some ideas for changing from time to time:

  • add cheese to add crunchiness (beaufort, gruyère, etc.)
  • add a fondue of white leeks, onions
  • add fennel in strips for a “fresher” taste
  • instead of putting cream and milk, for a less rich version, put white poultry stock (and slightly melted onions) for baking potatoes
NOTE. You can prepare the gratin the day before for the next day. Just put it to warm to 150 ° C for 15-20 minutes before tasting it.
Enjoy your meal!

Photo credit Nicolas Girodon-Déniel

Posted on Leave a comment

Granola & porridge

These are two breakfasts that fill me up well enough for the morning, and once again, these are recipes that can be adapted to your tastes, and so we never get tired of them. I hope they will suit you!

HISTORY. The “granula” appeared at the end of the 19th century in the United States and seems to have been a cereal bar made from milk and oatmeal. Fruits are added to recipes at the start of the 20th century, and sugar in the 1960s.

Granola differs from muesli simply because the cereals are cooked.

INGREDIENTS – Granola (for 1 week of granola at breakfast for 1 person)

  • 100gr of rolled oats
  • 100gr of spelled flakes
  • 100gr of hazelnuts
  • 100gr of almonds
  • 20gr of olive oil
  • 50gr of honey

IDEA. This list of ingredients is indicative, for me it varies every week, if you do not like spelled flakes, put only oats, if you are fond of almonds, only put almonds, or put some more. You can vary on:

  • cereals: oats, barley, spelled, wheat, puffed rice, puffed quinoa…
  • nuts: hazelnuts, almonds, walnuts, pecans, cashews…
  • replace some of the nuts with seeds: squash, sesame, flax, sunflower, poppy, etc.
  • change the “sugar”: honey, maple syrup, agave syrup, rice syrup …

Each member of the family can make their own granola and adapt it to their tastes!

RECIPE – Granola

  • Cut the hazelnuts and almonds roughly in half (do as you can and above all watch your fingers)
  • Mix all the ingredients, spread on a baking sheet and bake for 20 minutes at 170 ° C.
  • If you can, but it is not essential, you can stir after 10 minutes, this will standardize the cooking.
IDEA. After cooking, you can still add pieces of chocolate, dried fruit (apricots, figs, etc.). And if you’re fond of coconut, I recommend adding it halfway through cooking, so that it cooks a little.
TASTING
Simply with fresh fruit, or served on yogurt, milk, porridge, smoothie …
IDEA. I also make a salted version of this granola (I still leave 20g of sugar, but according to your tastes you can adapt), and I add spices, salt. I add it on soups or salads, it brings a little change and it can break a monotony.
CONSERVATION

I keep it in a jar, and it never lasted more than a month … If you want to keep it longer, apart from the oil which may go rancid and which I would therefore advise to remove from the recipe, the date will be the closest of all the dates of the elements used.

HISTORY. Porridge is one of the “mash”, consumed well before bread, which appeared 4000 years ago.
NUTRITION. It’s the most efficient way to digest grains and legumes. And porridge has a satiating effect because the viscous texture reduces appetite.
In the same vein, there are porridges all over the world: oatmeal, congee, polenta, rice pudding…
INGREDIENTS & RECIPE – Porridge made the day before (for 1 person)
  • 40gr of flakes
  • 60gr of water (or another liquid: milk, vegetable or not …)
Pour the water over the flakes. Leave to soak overnight and it’s ready.
You can reheat it a little in the pan if you prefer it hot.

INGREDIENTS & RECIPE – Porridge “minute” made (for 1 person)

  • 40gr of flakes
  • 110gr of water (or another liquid: milk, vegetable or not …)
Put the flakes into a pan. Also pour in the water. Heat, stirring gently, until a “bubble” burst. Serve right away.
IDEA. You can use oat or spelled flakes, buckwheat, barley, wheat, millet … It is best if the flakes are flattened with their husk and the germs are preserved (complete). ). I also find it more practical – but it’s a matter of taste, do as you prefer – that the flakes are a little crushed (possibly if they are complete, mix them quickly).
Serve it with fresh fruit and maybe a little granola to add a crunchy texture?
Enjoy your meal!

Photo credit Nicolas Girodon-Déniel

Posted on Leave a comment

Quiche (and crackers)

A classic in my family, a memory of Sunday evenings, at the family table or to take away for my trip back to my student room.

I give you a shortcrust pastry recipe if you want to make it yourself, otherwise take or make the dough you like!

INGREDIENTS – Shortcrust pastry

  • 250gr of flour
  • 1 pinch of salt
  • 125gr of butter
  • 50g of water
  • 1 egg yolk (optional, replace with 20g of water otherwise)

RECIPE – Shortcrust pastry

  • Mix the salt with the flour.
  • Add the butter (preferably cold) in pieces. Work with your fingertips by coating the pieces of flour butter and crushing them by sliding your thumb over your fingers. Re-coat them with flour and repeat until there is no more “free” flour (which does not coat with butter). The mixture remains coarse. Small and large pieces, that’s normal.
  • Add the egg yolk and mix quickly, then immediately add the water.
  • Combine the dough and form a ball.
  • Let stand at least 1 hour.
  • Spread (at 3mm for me, between two wooden sticks 3mm thick that can be found in DIY stores for example), darken, prick the bottom with a fork and let stand another 2 hours .

TRICK. From the moment you have incorporated the egg and flour – and this applies to all pasta recipes – work the dough as little as possible, otherwise it will develop gluten and its elasticity. Resting the dough will make it less elastic and it will shrink less during spreading and baking.

RECIPE – Crackers

With my scraps of dough, I make some crackers for the aperitif:

  • Re-form a ball with your dough scraps (be careful if you used a puff pastry, if you mix them as it is, you will lose the puff pastry, you will rather have to stack them on top of each other, as flat as possible and re-spread)
  • Spread again to 3mm (or more or less depending on your preference, they will be a little thinner because I re-spread them a little later)
  • Add whatever you want to your crackers. In the photo I took a mixture of seeds and a mixture of 4 spices. But my creations vary as desired: put seeds, spices, cheese, herbs … Or plain if you want to use them with a spread.
  • Add salt.
  • Spread again (without the crimps, we want to refine), so that the additions are embedded in the dough.
  • If desired, brown with egg (or milk, or not as in the photo)
  • You can also cut them before cooking, it will be more practical.

INGREDIENTS – Migaine (this is the name for the liquid garnish of the Quiche)

  • 4 eggs
  • 4 tablespoons of fresh cream
  • 2 tablespoons of milk
  • 2 tablespoons of flour
  • salt & pepper

RECIPE – Migaine

Mix it all up! With a whisk, it’s easier. If you like a “flan / clafoutis” texture, beat hard until there are no lumps. . If you prefer a lighter, more airy texture, don’t beat too hard and stop when there are still a few small lumps.

HISTORY. The quiche recipe has evolved a lot since its first mention in the 16th century.

The name comes from the Lorraine region “kich” (cuisine) which originates from the word “küche” (kitchen in German).

The first written recipes date from 300 years later… And they are more like what we call today a pie: a device based on white poppy soaked in water overnight, ground, to which milk was added, cream and chopped onions in butter. The whole enclosed between two pastas and gilded with egg yolk.

It is around 1870 that we find a version with eggs and cream, but without bacon!

Today’s recipes have replaced some of the cream with milk to make it a little less rich, some add grated cheese, but if you do not want to get in any trouble with a Lorraine guy, then never say that this is a quiche!

INGREDIENTS – Garnish & Finalization

  • 250gr of bacon
  • 250gr of shoulder dice

RECIPE – Garnish & Finalization

  • Blanch the bacon (this step is used to remove some of the salt used for storage): cover with cold water and boil 3-4 minutes. Drain them. If you have fresh breast, firm it a little in the pan, without colouring.
  • Divide the filling over the dough.
  • (Optional: Add grated cheese)
  • Pour the Migaine over the dough
  • Bake 30 minutes at 210 ° C (to be adapted according to the ovens, my cooking times change with each moving…)
  • Classically, I just serve it with a salad.

IDEAS. This classic recipe serves as the basis for very different tastes: you can add a variety of garnishes: ham / spinach, chicken / mushrooms, tuna / ratatouille, salmon / leeks, onions … You can also put herbs or spices in the Migaine : I often make a garnish with toppings of cauliflower with a migraine with cumin, or a garnish with cherry tomatoes in summer with a Migaine of oregano (or thyme …), and for the cheese, we can add gruyère, emmental, parmigiano …

I love this recipe, which is so adaptable and always quick to make, tell me if you liked it and how you adapted it at home!

RECIPE – Crackers

With my scraps of dough, I make some crackers for the aperitif:

  • Re-form a ball with your dough scraps (be careful if you used a puff pastry, if you mix them as it is, you will lose the puff pastry, you will rather have to stack them on top of each other, as flat as possible and re-spread)
  • Spread again to 3mm (or more or less depending on your preference, they will be a little thinner because I re-spread them a little later)
  • Add whatever you want to your crackers. In the photo I took a mixture of seeds and a mixture of 4 spices. But my creations vary as desired: put seeds, spices, cheese, herbs … Or plain if you want to use them with a spread.
  • Add salt.
  • Spread again (without the crimps, we want to refine), so that the additions are embedded in the dough.
  • If desired, brown with egg (or milk, or not as in the photo)
  • You can also cut them before cooking, it will be more practical.

Photo credit Nicolas Girodon-Déniel

Posted on Leave a comment

The French Crêpes

I share with you a family recipe; this is one of my first memories of cooking!

French Crêpes are perfect because:

  • making crêpe batter is fast
  • everyone can cook their own, so the work is evenly distributed
  • everyone garnishes them to their taste

FUN FACT. In France, for the salted version, would you say Crêpe or Galette?

You can absolutely say both! In France, it depends if you are in Lower Brittany (generally west of Saint-Brieuc and Vannes), where we say Crêpe, or in Upper Brittany (therefore in the East), where we say rather Galette!

But the recipes differ: the Crêpes contain milk and eggs while the Galettes contain only water, flour and salt (and are therefore completely vegan in addition to being gluten-free). But beware if you talk about Galette in Lower Brittany, you will rather be given a good butter cookie!

INGREDIENTS for buckwheat Crêpes – salted (for 15-20 Crêpes):

  • 250gr of buckwheat flour
  • 4 eggs
  • 1 teaspoon of salt
  • 200g of milk
  • 500g of water

INGREDIENTS for wheat Crêpes – sweet (for 20-25 Crêpes):

  • 500gr of wheat flour
  • 4 eggs
  • 40g of sugar
  • 1 teaspoon of salt
  • 200g of beer
  • 500g of water

RECIPE (the process is the same for both recipes)

  • Put all the solids in a bowl (flour, salt and possibly sugar)
  • Pour the milk (salted version) / beer (sweetened version) in the middle and whisk hard until the mixture is smooth.
  • For the sweet version, add a flavor here if you wish (fruit alcohol: cognac, rum, orange blossom water, etc.)
  • Finally dilute with water.
  • Let stand at least 2 hours.

NOTE. Rest is not mandatory; you can make your Crêpes or Galettes immediately. However, rest allows proteins to develop and will make your Crêpe or Galette more flexible.

COOKING

Everything is allowed, if you do not have the famous “billig”, even a simple non-stick pan will do the trick. No pressure, it is a commonly accepted rule to miss the first one (a Breton saying says that it is for the cat, for the dog or for the innocent of the house). However, I have noticed fewer failures when I oil the pan well the first time and when the pan is really hot.

FUN FACT. The first Crêperies opened in 1920, people went there with their own cheese and ham. I also learned, when writing this recipe, that one of my grandfathers was going to the Crêperies as a child alone with his egg!

TASTING

For the salted version, the most common in France is the “complete” with ham, cheese and an egg. But everything is possible: ratatouille, sausage, salmon …

TRICK. Salted pancakes can be frozen! They will even be even more flexible after thawing. An idea for a cold meal: garnish and roll the salted pancake like a wrap with what you have or what makes you happy, just accompanied by a salad and it’s perfect!

For the sweet version, simply butter (semi-salt, if we stay with the theme) with sugar, or caramelized apples, citrus fruits, some jam, spread…

IDEA. To keep the children occupied while making them happy, make a pancake cake: each time you have cooked a pancake, place it on a plate, the child spreads the pancake with what you have chosen, then you place the next on and so on. At the end, you have a pancake cake, fantastic for an afternoon tea!

Photo credit Nicolas Girodon-Déniel